5.0 KVIrc Connection and IRC Settings

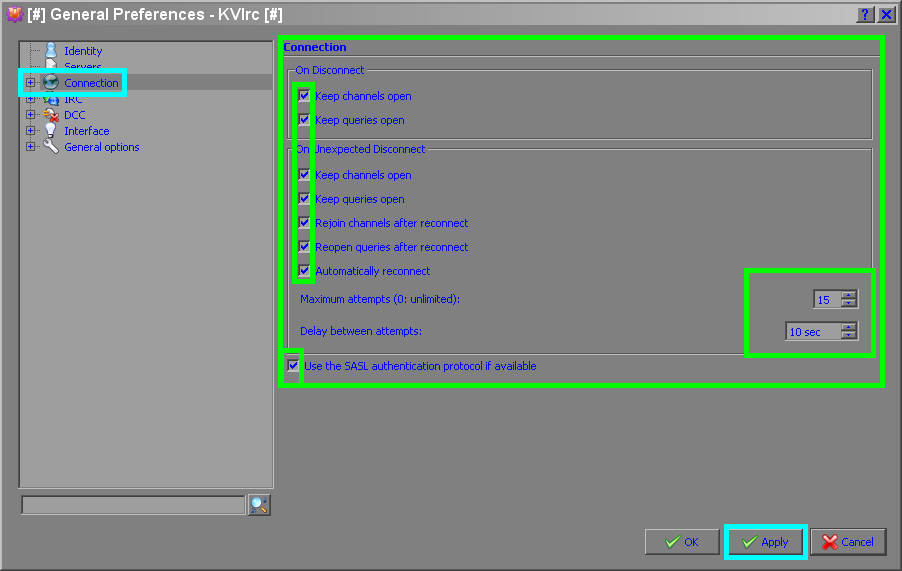
Step 30: Here are a lot boxes to check (usually it is perfect preconfigured, thus leave like it is) but for better understanding I give a short example of it meaning!
On Disconnect
[x] Keep channels open // It keeps channel windows open so you can read the last part of a conversation.
[x] Keep queries open // your chat queries will stay open on a disconnect so you can read the last part of a private conversation.
On Unexpected Disconnect
(there a lot disturbances around the Internet, people puzzled about, all this options bridge more of interruption)
[x] Keep channels open // same description like On Disconnect.
[x] Keep queries open // // same description like On Disconnect.
[x] Rejoin channels after reconnect // Bring you back in line, if possible!
[x] Reopen queries after reconnect // Rapid recover the last private chat, if possible.
[x] Automatically reconnect // Automatically reconnect to every server you are temporarily disconnected from, if possible!
Maximum attempts (0: unlimited): 15 // With this settings the client try to establish a connection 15 times then give it up and still stay in a idle mode (this counter started also when KVIrc launched and automatically connections are preconfigured, see at part 3 step26 - step 31).
Delay between attempts: 10sec // With this settings a chronometer count 10 seconds till a new try to make a connection.
[x] use the SASL authentication protocol if available
SASL is the Simple Authentication and Security Layer, a method for adding authentication support to connection-based protocols. To use SASL, a protocol includes a command for identifying and authenticating a user to a server and for optionally negotiating protection of subsequent protocol interactions. If its use is negotiated, a security layer is inserted between the protocol and the connection. More information here "@ Click". If you changed anything click Apply then open the Connection tree and move to the Proxy tab.
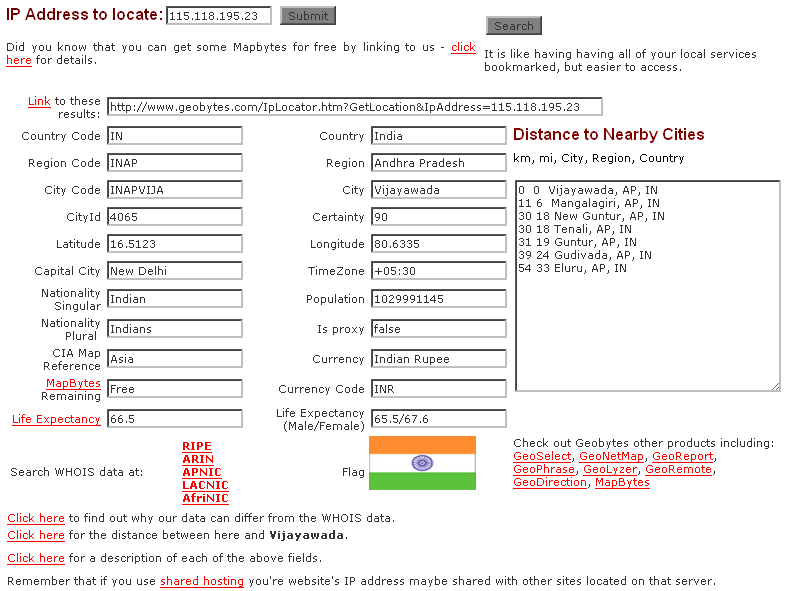
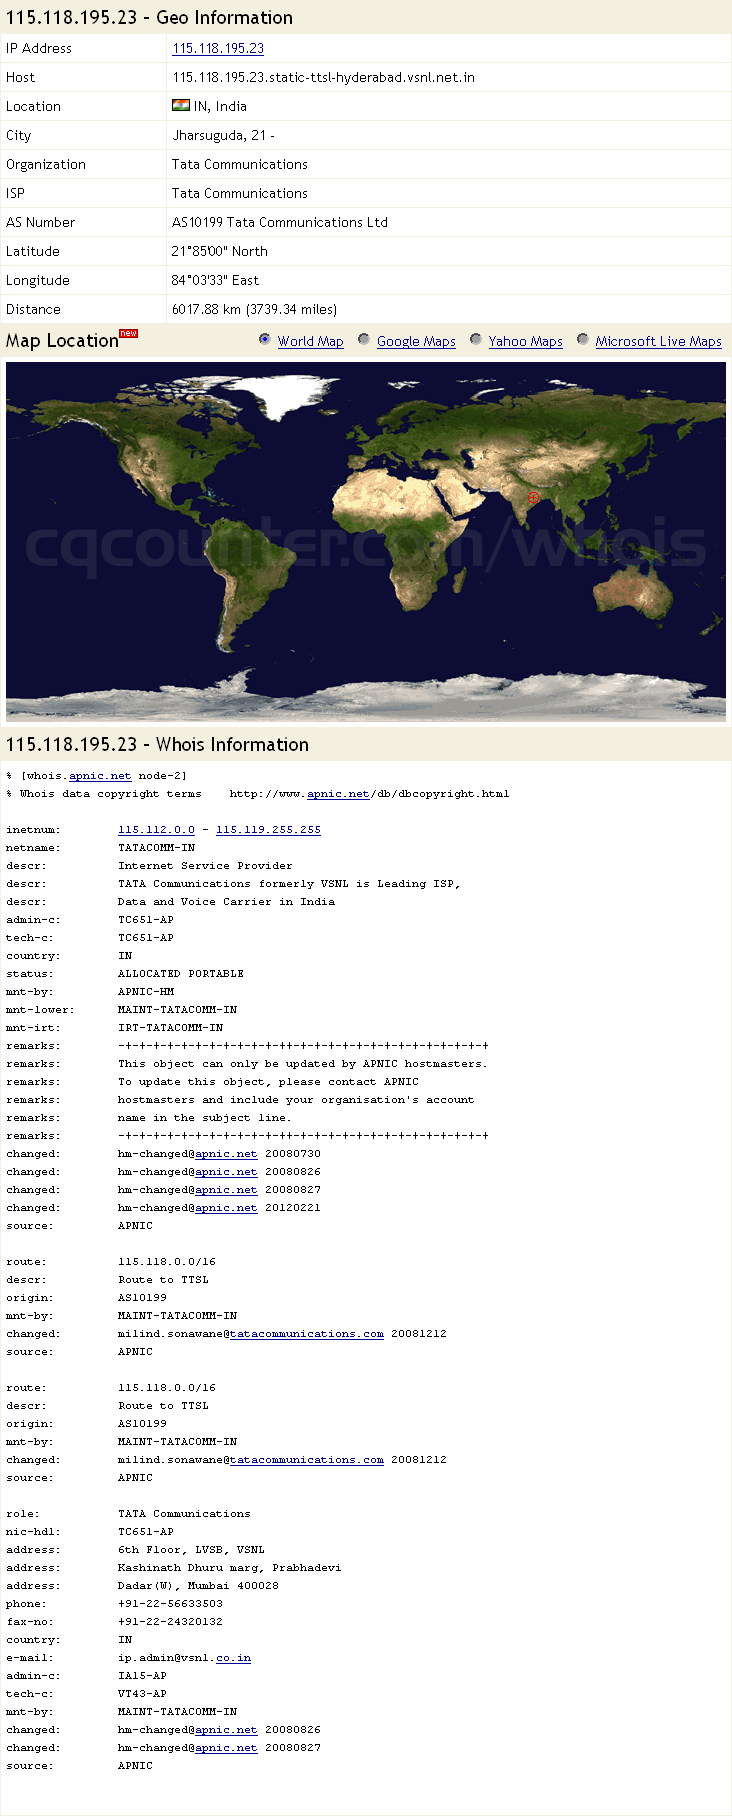
Step 31: To configure a proxy is easy but to find a good one works is difficulty (IRC Proxy). A proxy is nothing else then a continuation of your Internet connection under another IP (ID) assumed by a remote host (computer, server, host, pc). There are many advantages using a proxy instead of your regular Internet service provider IP (ID). For example there power full features provided like firewalling (packet filter), high level content filtering, anonymity, traffic encryption or caching (squid for web browsers). But there also a lot disadvantages because it is difficult to figure out who are the heads behind it and what they monitoring (log). But at least this is the risk each time open a web page, it is the same like with all servers to which make a active connection. But there ways to find out what a autonomous community is behind a IP address. When you have the IP number got to "@ Click" or "@ Click" and made a report. Like in my example here:
Report 1
Report 2
Now
it's up to you to find more from this information
(google)... 
OK, First have to get a list of available proxys, there free and some you have to pay for use. Here is a list with free proxy available at "@ Click". This have no special features, for particular kind of proxys you have to use google!
In my example here I choose a Indian proxy location to establish a connection (shown in report 1 + 2).
Now follow this steps!
1. The first point is a clutch of pull down menus gives individual selections (look at the Available Proxies screenshot). Still depends on your taste whatever you prefer to use! (help yourself or use google).
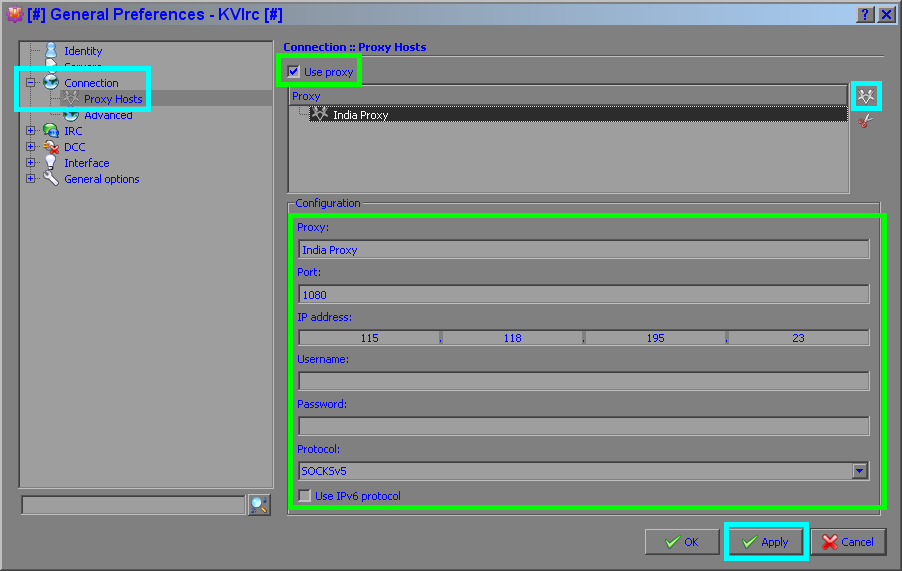
2. The second point is the IP address have to transfer into your KVIrc blanks (look at the picture).
3. The third point is the port number have to transfer into your KVIrc blanks (look at the picture).
4. Here have to choose the Internet protocol type for transmission, I choose Socks 5 (look at the picture). More information about Socks and http protocol types can be found here "@ Click" or at google.
5. The spreadsheet at point 5 displayed the availability of the proxy servers at present.
6. Here are the country's listed still available for workarounds.
7. This gives information about quality and speed (click details or use google for more info's).
Available Proxies

If you plan to use a proxy check the box [x] Use proxy. Push the tiny circle icon at the top right corner and give it a name. Then follow step 1-7 above to transfer your required settings. After all fields completed we have to move back to part 3 at step 28 of this guide. Look at the Picture on there i marked the pull down menu with a green 1. In the pull down menu you can chose now your preconfigured proxy.
from
your Internet service provider (ISP) 

to
an
Indian location 

Well
done click Apply. you can monitor the
connection attempts after click the plug icon  on
the top left corner of the main screen (screenshot at guide part 3
step 18). If it is not work just try another proxy or fall back to
the Direct connection settings! If you have done this couple of times,
you will see it is very easy to use. Click at the next point in the tree on Advanced.
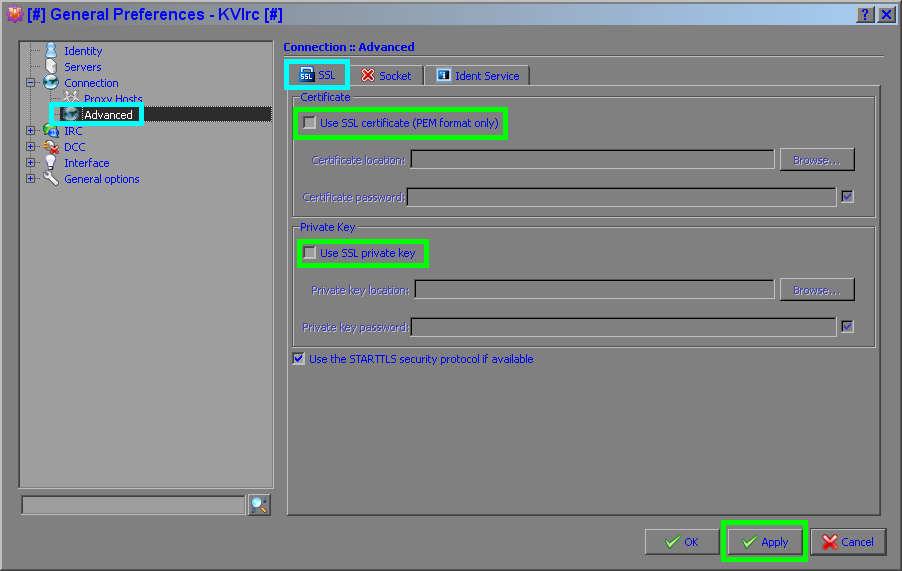
Step 32: In the Advanced tab you see first the SSL certificate management. For everyone study law this tab could be an add-on.
What is an SSL Certificate?
SSL Certificates are small data file that digitally bind a cryptographic key to an organization’s details. When installed on a server, it activates the padlock, IRC(over port 7000) and allows secure connections from a server to a client. Typically SSL is used to secure credit card transactions, data transfer, log ins and more recently is becoming the norm when securing social media transmissions (transactions). An SSL Certificate binds together:
Your domain name, server name or host name
Your organizational identity (i.e. company name) and location
Why is it important?
Firstly, when you enter data (including passwords, credit card numbers) over a non-secure Internet connection, the data is transmitted from your PC to the destination server in plain text. The fact that your browser shows a bunch of '******' for the password is simply what it shows you. Your password is still being transmitted as plain text!
So what does it matter?
Any data transmitted over the Internet as plain text can be intercepted. It's as simple as that. A person with malicious intentions simply has to listen on the right ports or look in the right places to read exactly what you entered. If that data happened to be your password or your credit card number ... well, you can make up the rest of the story ... and it does not end well.
How to get a certificate?
There many different ways to obtain a certificate, is depends on the vendor and if its public or private. You can also create your own certificate. The public certificates are usually automatically transmitted within the SSL application (KVIrc) at the first connection. So usually it is quite enough to check the box use SSL protocol. If you like to do so go back to guide part 3 step 28. There are also applications has a lot build in certificate inventory, like your web browser for example. To obtain a private certificate you have to search through the website of the vendor https://christian-chat-chalice.com/ or e-mail a responsible administrator. Help yourself!
More information's about SSL and SSL certificates can get here "@ Click"
The STARTTLS box [x] is a bit intricate, but is good to use for beginners don't understand how network transmissions working. the STARTTLS is a auto sense functional sequence (protocol) to check if a server has a secure connection available and automatically switch to a secure connection if available. This has assets and drawbacks because the first attempt is always unsecured, experts may work blind or know what is necessary.
More information's about STARTTLS can get her "@ Click"
If you have a certificate and tamed KVIrc so far to use it check the required boxes browse the location, enter a password and enjoy the ride.
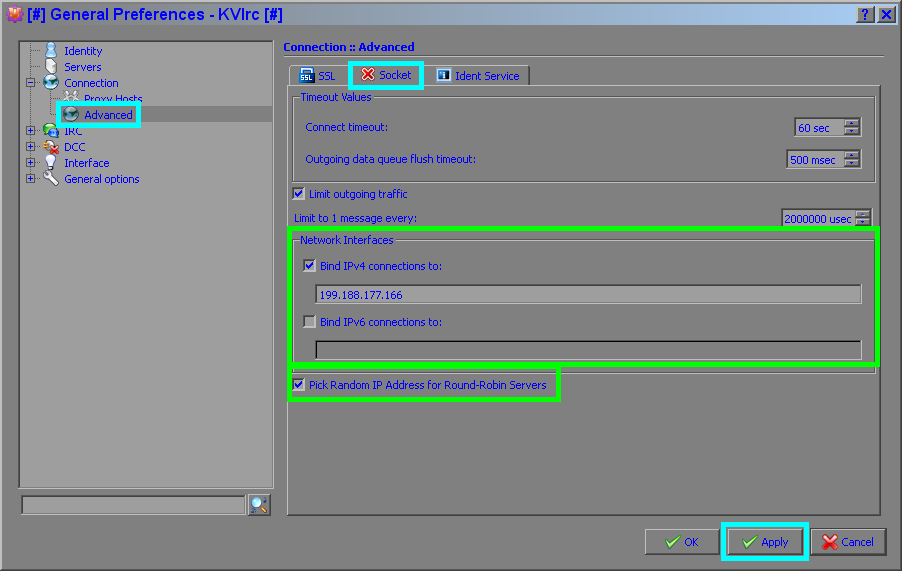
Step 33: At the Sockets tab. Skip the first 3 points (usually it is perfect preconfigured, but if you like to fiddle, help yourself). The Network Interface settings may be interesting. Here you can bind your IP to a network device. Best example to understand is like on a crossroad cars can turn left, right and straight. Depends on how much network cards you have build in 1 computer you have to ......................... teach KVIrc the ins and outs.

That's a piece
of cake! At every
start of your computer windows give each enabled network card an IP
address (DHCP). To get this IP hit you START
button  then choose
run
 and
type in
the blank: cmd
And hit OK
or press return!

In the command line windows type:
ipconfig /all
The
screen appears displays all available devices build in. Now look
for the right IP address, in my example it is a IPv4 address (look at
the screenshot). Usually it is an IP of an enabled network device with
an active gateway IP. If you choose a wrong IP for the Socket bind
blank, you got a socket error and cannot chat (help yourself  ).
If you are a owner of a single network card with 1 active connection
you can leave this untouched. (also wireless network devices are
possible)
ipconfig /all
The box [x] Pick Random IP Address for Round-Robin Servers will cause the KVIrc networking stack to pick up a random entry when multiple IP address are retrieved for a server dns look up. This is harmless and can fix some problems with caching dns servers that do not properly rotate the records as the authoritative ones would do. On the other hand, you might want to disable it if you want to rely on the dns server to provide the best choice. Look at guide part 3 step 28 [x] Cache IP address and DNS address resolution, that may help to understand the thing a bit better. Then move to the next tab.
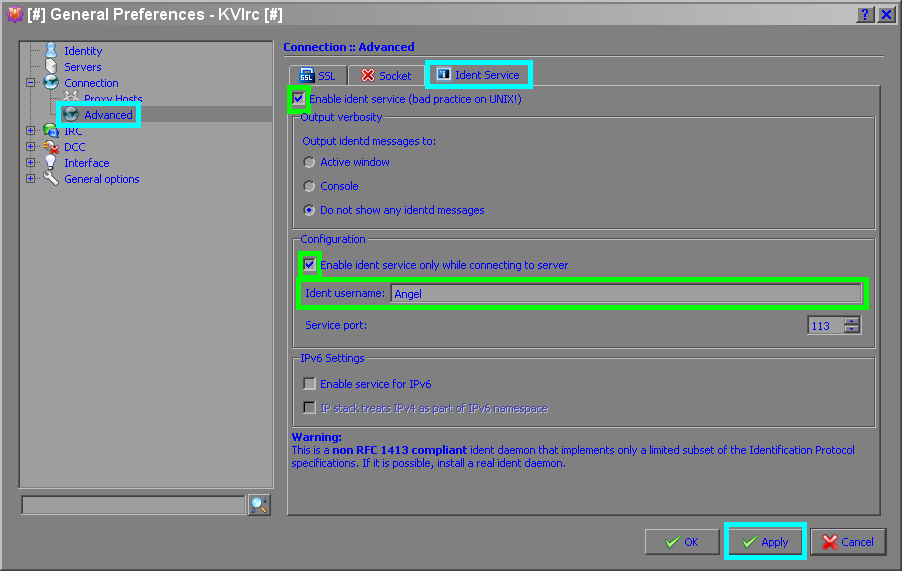
Step 34: When the Ident services is disabled it is a privacy thing for you and if the Ident service is enabled it is a support thing for administrators. The Ident service is mostly used by various IRC network to ask a remote server which user is making a connection. Usually it's not mandatory to enable the Ident service (recommend). But there some abusive users from certain ISP's or IP ranges that makes administrators or server owner feel compelled to force user enable the Ident service to allow them to visit there networks. But any person with two brain cells know that the remote host (you) can simply choose to lie. Don't be deceived, network administrators are be quite good and knows all the tricks! Make a choice for enable / disable and type a name. You have to enable this service if a message appear like:
-irc.servername.net- *** Banned Temporary K-line 43200 min. - [nick] Due to consistant abuse from this subnet, users are now required to install identd on their computers.
You
have draw the
shortest straw! 
Alright continue in the IRC tree!
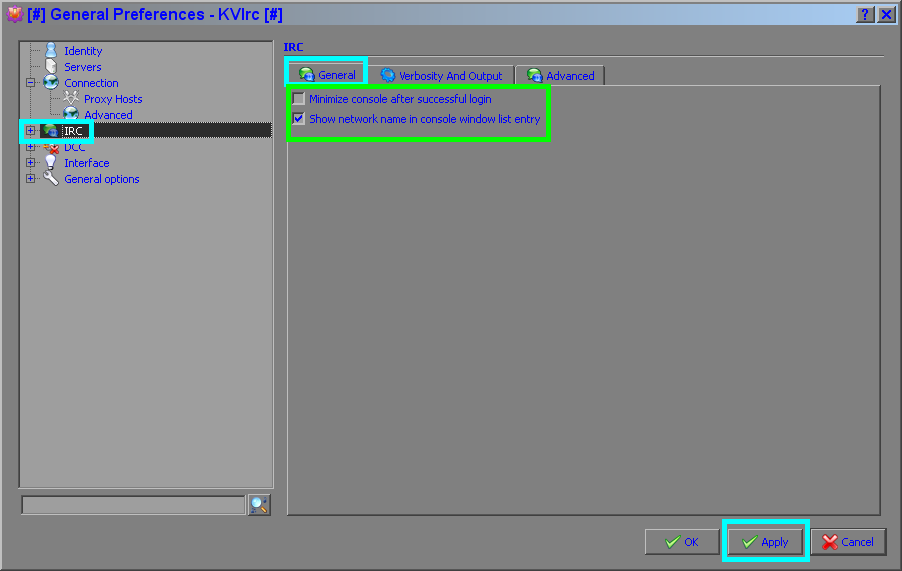
Step 35: In the first General IRC tab, there only 2 boxes:
[x] Minimize console after successful login // This option will cause KVIrc to minimize the console window after successfully logging into a server.
[x] Show network name in console windows list entry // This option will cause KVIrc to show the network name as the console window list entry instead of the server name. This is nice to keep on unless your servers are not organized in networks or you often connect to two servers of the same network.
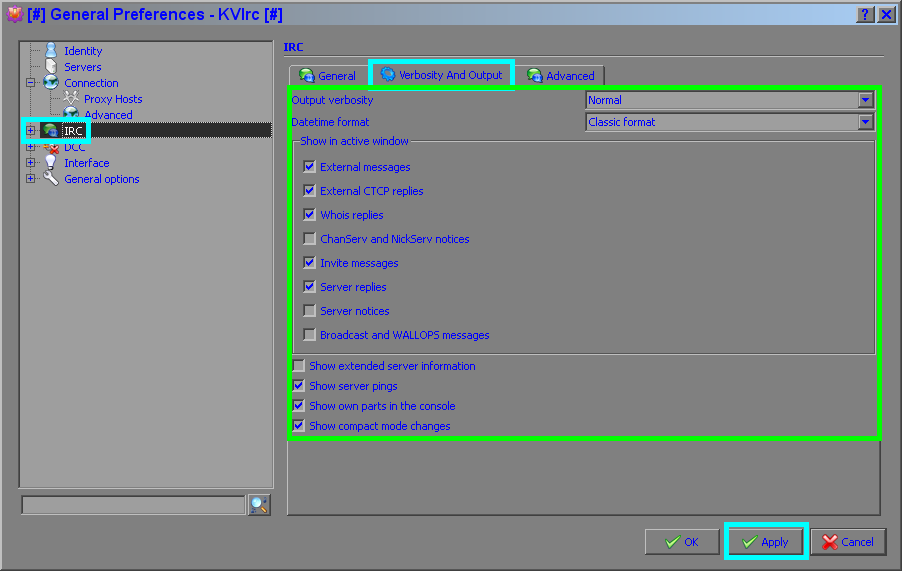
Step 36: Verbosity And Output
Output verbosity: // Can set to mute, quite, normal, verbose, paranoic
every step revel a little more / less information at the console window. The paranoic mode is not recommend because it flood the screen (only for debugging or geeks).
Datetime format: skip it unmodified!
All this settings refers to your active window and are good to be quick and well-briefed! Normally it is the window you chat at the moment.
[x] External messages // When this is checked all people outside of a channel do a send a message via
/msg #ChristianChatCafe Good Day!
all this messages appears in your active window (in this example, the text: Good Day!).
[x] External CTCP replies // CTCP allows users to query a remote client about the version of the client they are using (via CTCP VERSION), the time (via CTCP TIME), or get remote user info (via CTCP USERINFO), among other things. If this option is used and some people outside of a channel use the CTCP command to reveal information from your client, the replies (attempts) appears in your active window. For CTCP commands look here "@ Click"
[x] Whois replies // When this is checked all people do a whois command via
/whois Nicodemus
all replies (attempts) appears in your active window. The Whois command is to see a bit more information about another user. You'll see what server another person is using, or what their ISP is. Pretty helpful when you don't recognize a nickname that wants to chat. You may recognize the IP, and then feel more comfortable carrying on a conversation. You'll also be able to see what other channels a person is in, which might be a good indicator if you really want to talk with them or not.
[x] ChanServ and NickServ // ChanServ has been created in order to stop channel takeovers, automate channel management, and to make life easier for users in general (is more interesting for channel owner). NickServ allows you to "register" a nickname and prevent others from using it (identify). If enabled and you play around with such commands you see the replies in your active window.
[x] Invite messages // Clear thing if someone try to fishing you, you cannot escape the clutches of the messenger. Because the message appears direct on your active screen :)
[x] Server replies // If enabled, specified server replies appears in your active window.
[x] Server notices // If enabled, notices set by administrators or server owner appears in your active window.
[x] Broadcast and WALLOPS // Allows you to receive wall user message sent by IRC operators. Wallops are viewable by all IRC operators, in addition to, normal users who manually set their mode +w (wallops). If enabled it appears in your active window.
[x] Show extended server information // corresponds with the description.
[x] Show server pings // If enabled, show pings goes to your client.
[x] Show own parts in the console // If enabled, it leave after a channel left the quit message in the console as well. Usually not need!
[x] Show compact mode changes // Info's are here: "@ Click"
Step 37: Advanced
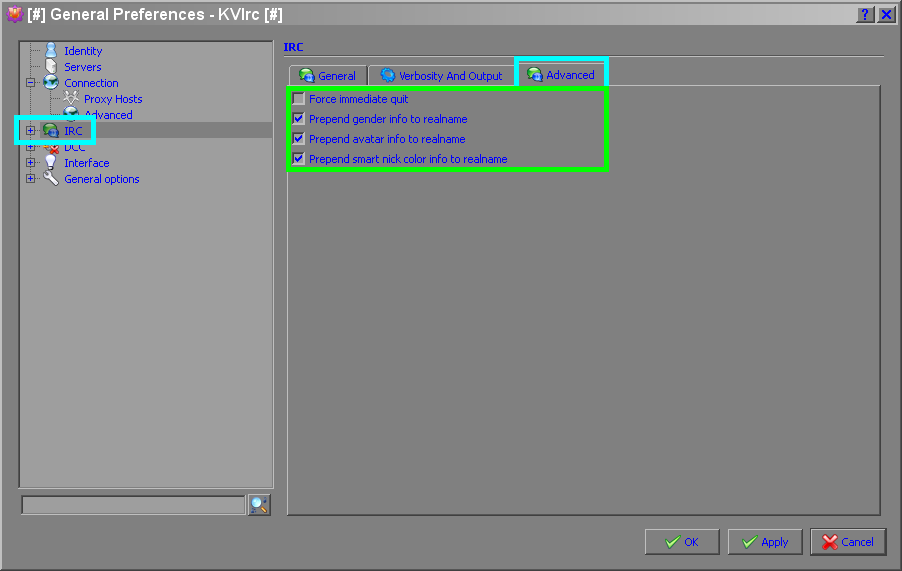
[x] Force immediate quit // This option causes KVIrc to close the connection immediately after sending the QUIT message. When this option is disabled, KVIrc will wait for the server to close the connection. Note that if you use this, your QUIT message may be not displayed.
[x]
Prepend gender info to realname //
Can maybe drop the asl question (+user info). If enabled and the
pointer of a remote chatter (user) scrolls over your nick a pop up
appear with info's about male / female. Most do not like to disclose
this secret  .
.
[x] Prepend avatar info to realname // Same effect like with your gender just the image of your avatar appears, if you have set one at guide part 3 step 25. Remember if the avatar has dimensions around 800 x 600 pixel it goes over the whole screen and may bother other chatter.
[x] Prepend smart nick color info to realname // Give you a better alignment if enabled!
<<< Back | Home | Next >>>
